
I’ve stopped and picked up countless old rusty saws in antique shops, checked the teeth and looked down the line to see how straight they were. Invariably they are past trying to bring back to life as a worker, but I have some excellent saws, some good saws, and some I was being too optimistic about.
A good old saw will outperform any modern handsaw, even when you allow for sharpening time, I’ve tested rip saws against new modern saws, and the cutting time is less than half that of the modern saw.
Sometimes things come together unexpectedly and take you off in a new direction. I found a saw doctor’s book on ebay that looked interesting, I hoped it might have some new (1920s) saw sharpening techniques for hand saws, it didn’t! But it did have a small section on the advantages of using a fly-press for cutting saw teeth in bandsaw blades. Around this time I came across a fly-press with tooling from a saw doctors, set up for re-toothing handsaws. Needless to say it joined my collection of tools in my workshop.
Originally I was going to re-cut some of my old saws. I could re-cut a new saw, but that wouldn’t be as much fun as trying to make a new saw from scratch, and I’d get a saw that would be customised to what I wanted.
Vintage saw design had a lot of facets, hand saws changed over time, with their pinnacle of development at the tail end of the 19th C. Tooth pattern, taper grinding, skew backed, handle position and steel quality all being changed and improved. I have a Disston No7 from this period, and decided to use that as a starting point for my new saw.
After a lot of research on the internet, and asking questions of those in the know I eventually found the steel type and grade required for my handsaw. Spring steel CS95, hardened and tempered to 530-570 VPN, this has a carbon content of around 0.95%. The quality of the steel is vital, it needs to be hard enough to hold its edge, and soft enough so you can file it and the teeth don’t snap off when setting.
So here is how I made the blade.
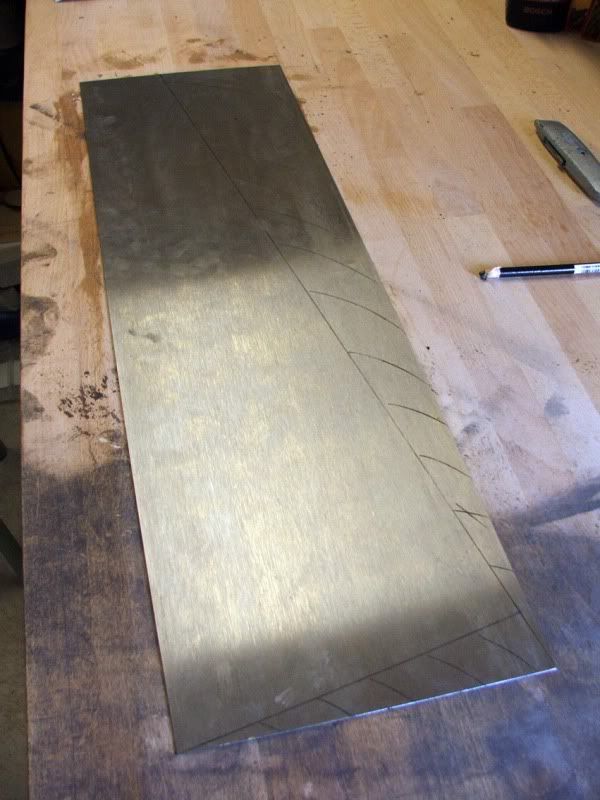 The new steel plate (750 x 225 x 1mm).
A guide was clamped to the steel plate ready for cutting with a 1mm cutting disk. The cutting was carried out very slowly with multiple cuts, to prevent excessive heat from either buckling or losing the temper of the steel.
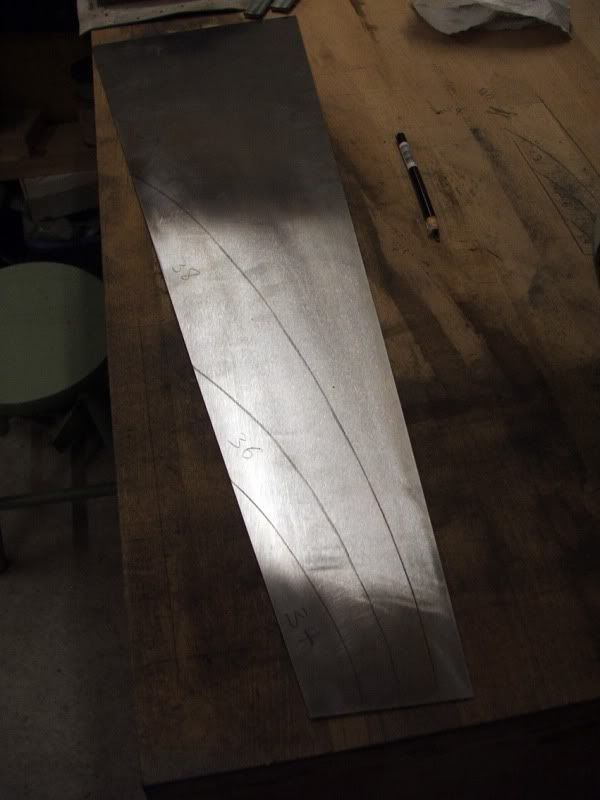
When all the cuts are complete the saw is held in a saw vice to have any sharp edges removed.
All 19th C hand saws were taper ground; this made the saw thinner along its back edge. This had three benefits.
It made the saw lighter and moved the weight to the tooth line, which improved control of the saw when cutting.
It made the saw less likely to jam in the saw cut.
It reduced the amount of set required,
smaller set = thinner cut = less effort.
Just as in cutting the plate, it is important that as little heat as possible enters the blade; I repeatedly cooled the blade every time it reached touch hot. (Somewhere after warm but still comfortably holdable in your fingers)

The saw will have a graduated tooth line from 5ppi at the toe, to 3.5 ppi at the heel. (points per inch)
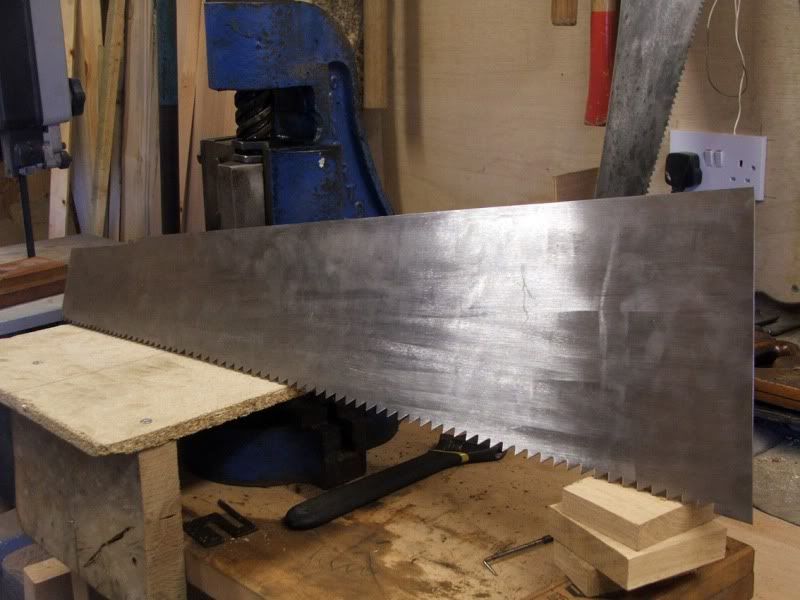
I punched the teeth with a fly-presswith guides to control the tooth size, angle and spacing. The previous tooth stops on the guide to set the spacing for the next cut. The saw is emerging from the blade. You can see the changes is tooth size as I move along the blade.
Each tooth takes about 5- 10 second to line up hold and punch. Cutting the teeth this way ensures no heat enters the steel at the tooth line.
The saw now has a slight curve in the blade from the stamping process, but this is removed later.
Another weekends work.
This is a great write up on how you made a saw blade. It is something I have been wanting to do and had some quesitions about. I've read about using a fly press and would like to find one. The parts I've been most curious about and not able to find info on are how the taper grinding is done and how the saw is "tensioned". Would you mind sharing how you did the taper grinding?
ReplyDeletehi i am a teacher from Iran of west of Asia
ReplyDeletei do this job for love and hobby
making saw ,knife and like that
i would prefer to share our experience if you agree this will my honor
Email; alireza.farsi@yahoo.com
It's a nice information for Woodworker. I'm Looking a Chop Saw for my Woodworking services. Would you suggest me which are the Best Metal Chop Saw on the market?
ReplyDeleteCould you share the title of the book? This is a subject I am interested in learning more on.
ReplyDeleteVery Informative Post! I really appreciate your way to describe Saw Blades. With the capacity to cut just about any material and to cut it just about any way you need it cut, Circular Diamond Saw Blades are some of the most useful and commonly used power tools in the industry. Thanks for sharing.
ReplyDeleteThanks for the article. I'm looking for a good metal chop saw for the work.
ReplyDeleteIt was really insightful.
ReplyDeleteThanks for such a nice content.
Cheers
BTW if anyone interested more have a look sawfinder.com thanks
However, some hypoid and worm drive designs may not spin their cutting blades at as high of speeds as a direct drive. power tool reviews
ReplyDeleteMy name is Mrs. Celia Dave. I live in the UK
ReplyDeleteand I am a happy woman today? and i
told myself that any lender that rescue my
family from our poor situation, i will refer
any person that is looking for loan to him,
he gave happiness to me and my family, i
was in need of a loan of $250,000.00 to
start my life all over as i am a single
mother with 3 kids I met this honest and GOD
fearing man loan lender that help me with a
loan of $250,000.00 U.S. Dollar, he is a GOD
fearing man, if you are in need of loan and
you will pay back the loan please contact
him tell him that is Mrs. Celia Dave that
refer you to him. His name is Mr. Benjamin Lee
His Email (247officedept@gmail.com) Or whatsapp conversation : +1-989-394-3740.
Thank u for your Beautiful information.
ReplyDeleteOscillating Accessory
Very informative blog, thanks for sharing this valuable information. An aneurysm is the growth of an artery brought about by a fault in the arterial wall. Usually, there are no signs, yet a cracked aneurysm can lead to life-threatening complications.
ReplyDeleteThis blog post on making saw blades is incredibly insightful and thorough. I appreciate the detailed steps provided, especially as I'm interested in learning more about Slitter Blades. Great work!
ReplyDeleteThanks for sharing this post, keep sharing. Here Hair loss or alopecia, is a condition that affects everyone be it men, women, or children. There are numerous factors that contribute to hair loss.
ReplyDeleteVery nice blog, Thanks for sharing this information. Also known as sonography, an Ultrasound is a diagnostic medical test that uses high-frequency sound waves to capture and produce images of the organs inside your body.
ReplyDeleteAn impressive and well structured piece that delivers complex concepts with clarity and purpose. The seamless mix of theory and real world use makes it invaluable for informed readers.
ReplyDeleteHand Saw Blades
This blog is exceptionally well written, informative, and easy to follow. It explains the topic in a clear and engaging way while keeping the reader interested from start to finish. The structure, depth, and practical value make it a truly worthwhile read. Excellent work on creating such high quality content.
ReplyDeleteEnrgtech
Cordless Table Circular Saw